Showing posts with label modify. Show all posts

Tuesday, September 30, 2008

Opera Mini Mod v.3.10

Opera Mini Mod
Version 3.10.11508 (11/06/08)

Opera Mini is a web browser designed primarily for mobile phones, but also for smartphones and personal digital assistants. It uses the Java ME platform and consequently requires that the mobile device be capable of running Java ME applications. Opera Mini is offered free of charge, supported through a partnership between its developer, the Opera Software company, and the search engine company Google.

Opera Mini was derived from the Opera web browser for personal computers, which has been publicly available since 1996. Opera Mini began as a pilot project in 2005. After limited releases in Europe, it was officially launched worldwide on January 24, 2006.

Opera Mini requests web pages through the Opera Software company’s servers, which process and compress them before relaying the pages back to the mobile phone. This compression process makes transfer time about two to three times faster, and the pre-processing smooths compatibility with web pages not designed for mobile phones.

Features
Scrolling is achieved with the device’s arrow keys, its number keys, or a stylus.
Opera Mini may also be set to landscape mode, where it will rotate the page 90 degrees. This is useful for screens that are significantly taller than they are wide. However, this feature is not yet available on BlackBerries and some other devices.
The image quality may be set to “Low”, “Medium”, or “High”. The higher the image quality, the more data is transferred and the longer it will take to load pages.
Opera Mini supports only one font, which can be set to “Small”, “Medium”, “Large”, or “Extra large” size. If a web page uses Courier or a generic monospace font, the one font is still used, but the characters are spaced out so that each character takes up the same amount of space.

Browsing tools

Opera Mini features a search bar capable of using several pre-configured search engines, with the user being able to add additional search engines. The default search engine is Google.
Additionally, Opera Mini features shortcut keys, skins, and a web feed aggregator. It can save bookmarks, download files, and it remembers the user’s browsing history.

Privacy and security

When using Opera Mini 4.0 or 3.0 Advanced, the connection between the mobile device and the proxy server is always encrypted for privacy and security. The encryption key is obtained on the first start by requesting that the user press random keys a certain number of times. When using Opera Mini 3.0 Basic, the connection is not encrypted. Opera Mini has received some criticism because it does not offer true, end-to-end security when visiting encrypted sites such as PayPal.com. When visiting an encrypted web page, the Opera Software company’s servers decrypt the page, then re-encrypt it themselves, breaking end-to-end security.

Standards support

As of version 4, Opera Mini uses the same layout engine that will be included in Opera 9.5, the next version of the desktop edition of Opera.web standardsScalable Vector Graphics or Web Forms 2.0. Also, frames are flattened because of client limitations, and dotted and dashes borders are displayed as solid borders due to bandwidth and memory issues. And because Opera Mini reformats web pages, it does not pass the Acid2 standards compliance test. This means that Opera Mini supports almost all of the supported in Opera 9.5. However, unlike the desktop edition of Opera, Opera Mini includes no support for
Opera Mini supports bi-directional text, meaning that it can display text in right-to-left languages such as Arabic and Hebrew in addition to left-to-right languages like English, French, and Spanish.

Low-memory device support

For MIDP 1, low-memory devices, the older Opera Mini 3 Basic is still available. Its features include an option to increase the text size, as the default text size is too small for some web sites. Opera Mini 3 Basic uses less advanced compression, does not support full page view, does not include support for favicons, does not scroll as smoothly, does not feature a built-in clock, and does not support encryption. When browsing an encrypted web page with Opera Mini 3 Basic, the page is actually decrypted before being sent to the mobile phone.

Change Log
3.10 (11508) 11/06/08 list of the changes

Version 3.10 is based on the official version of hifi of v.3.1.10423 from 29.02.2008 and contains practically all functions of last modification 2.07 ([of].[versiya] of v.2.0.4509 from 04.07.2006).
This version has a number 3.1, undertaken from the base program and 0, as to [podversiyu], t [k] it is test and base for the entire (future?) the rule of 3.xx.
Tuning, preserved pages, [bekap] from the previous versions do not approach.
You follow the correctness of the installation of date and time in the telephone, otherwise, server will refuse to you in the discovery of pages with the communication: “The error of checking the certificate of server. Verify the installations of date on your device.”.

[It is added]

* 25.05.08 [v] charger the disconnected the checking of the presence of vacant place under the inject rocking file.
* 25.05.08 [v] charger, to the field of the introduction of way for the [media]- file is added the button of survey.
* 19.05.08 export and the import of layings with [ikonkami], [vnedrennymi] into the body of htm of file. The file of export is obtained one, but with [ikonkami].
* 17.05.08 separately is fixed the value of java-heap for the return to server and the size of buffer for the discovery of files in the editor (traffic \ memory).
* 17.05.08 discovery and correcting files in the HEX- regime. Showing of symbols for HEX- given in the codings ISO and WIN. Alternative type of the showing of text files (decrease of the consumption of memory).
* 09.05.08 sonic notification in charger and FTP. On each model of presetting they will sound on its!
* 04.05.08 after search, the obtained text is separated on the page. Color is added into the color diagram.
* 01.05.08 [v] of history [poseshchenye] pages are sorted on the date of last visit. Packing on the date depends on jackdaw to displace contents. In tuning of navigation it is possible to include the retention only of last [poseshchennoy] page for one [khosta].
* 29.04.08 support of reading the pages, [sokhranennykh] by the versions of 2.xx.
* 23.04.08 jackdaw to forced devastation of buffer in the charger and FTP during the record to the disk. Compulsorily must be switch oned for Sagem.
* 23.04.08 [v] of the menu of windows (panels) is added passage to the previous window (panel).
* 22.04.08 is altered upload of files - file is not stored into the tele- pages (but the permissible size of the sent file it did not increase especially). Photographs from the camera, as before are located in the tele-.
* 19.04.08 file [menezhder] has two panels with the separate ways. Switching between the panels through the menu of navigation. The number of panel is indicated on the upper border before the indication of way.
* 18.04.08 selection of permission for the photograph by camera.
* 12.04.08 for the models with the sensory screens into the contextual menu are added commands for emulation of pressure # and *, for the use in the hot, which then can be selected in the floating up window. (18.04.08 it is removed pause into 1,5[sek] during emulation of pressure #* in the contextual menu)
* 10.04.08 possibility of retaining the page, on which arose the error with [parsinge], for the transfer to me If page does not have menu for the selection of retention, then place the retention of page on the hot.
* 10.04.08 [po] #1 and on the discovery of reference in the window, the address of reference is added in the field of the introduction of address.
* 7.04.08 http-proxy for the discovery of pages. It works only for the protocol of http.
* 7.04.08 C[mena] and the addition of servers Ohm.
* In FTP is added the conversion of the names of the files of [v]/[iz] CP-1251, for the servers, who work in this coding.
* In FTP the showing of the concealed files on the server depends on jackdaw “concealed files” in the file manager.
* During creation or renaming of folder in the layings, with the name, which exists in the current catalog, to the new name is added [the number].
* The prohibition of passage according to the references with the already neglected task of the discovery page in one of the panel of program is included on. It is made so, because the outgoing and entering packets are ciphered with the code, which is changed in the real time.

[change]

* 04.06.08 change in determination and installation of the dimensions of the field of introduction and text block.
* 03.06.08 passages between the panels and the windows, with the neglected process in FTP.
* 26.05.08 additions to the discovery JPG with the large permission.
* 24.05.08 tuning of colors in the new performance.
* 20.05.08 jackdaw into the Tuning- form: To develop on entire screen, in the previous versions worked as the start of complete screen for duplicating of [softov], now includes and disconnects the [polnoekrannyy] regime of application independently of [funktsiii] of duplicating. It is added in the list of hot.
* 15.05.08 numbers of pages with the survey of text displace.
* 14.05.08 width of the active region of the wear and tear of commands on the lower border of [uvelichina] (for the sensory screens) but only with the shown lower border.
* 14.05.08 button of the survey of file for the indication of way or file, are fastened to the right of the field of introduction.
* 13.05.08 some reference- commands in the system windows are substituted to the buttons.
* 13.05.08 search in the editor of files also illuminates the obtained words.
* 08.05.08 jackdaw for the isolation of the obtained text in the entire current panel.
* 05.05.08 [Izmenen] the method of adding the hot, now old installations must not be dropped, if in the hot there was only addition.
* 05.05.08 [v] hot are added left and right [softy]. Assigned hot to these functions should be without the preliminary [*] and [#], otherwise work will not be.
* 05.05.08 with the import of color diagrams from the previous versions shows communication.
* 05.05.08 isolation of the desired text was on all pages in the current panel.
* 02.05.08 expansion of maximum cache and history.
* 01.05.08 separate fields of sorting for the file and FTP - managers.
* 30.04.08 determinant of the codes of the keys for mkey is accessible through the Menu-Information- hot buttons -mkey.
* 23.04.08 smooth warming up is smoother.
* 21.04.08 with the removal of entire history is selected the possibility of removal and list previously the [vvedennykh] addresses.
* 18.04.08 smooth warming up with the shift of cursor downward.
* 13.04.08 (recovery) color diagrams.
* 13.04.08 (recovery) the showing of the return of data into the network.
* 5.04.08 is altered the checking of time out in charger and FTP.
* 5.04.08 is altered the retention of layings, history, prospectors, templates, [vvedennykh] addresses, by analogy with the version of 2.xx. MAKE EXPORT!
* Are altered hot. Now installation occurs not on the previously [razreshennoy] button, but according to the function, by which the desired combination of buttons is appropriated.
o Hot can be dual, with the first button [#] or [*].
o Hot [*] has the larger priority above the laying with the same combination.
* Code of authorization [neeksportiruem] for purposes of safety. For the displacement between the versions use the leaf of paper, which you will then eat, or templates.
* The code of authorization and the code of the coding of data for the exchange with the server is exported with the export of tuning. Do not give out your [bekapy] and do not use strangers.
* [Apload] of files only on “the present” the, i.e., not modified version. [Apload] itself limited - to the page comes file with the name “of photo.jpg” or “photo.png”:
MIME of type - jpeg, if are actually sent image of jpeg or others data, MIME of type - png, if is sent away image to png. There are no limitations to the type of the unloaded file. [NEperezagruzka] of pages in the histories, which are removed from cache on silence it is included on.
*

[correction]

* 08.06.08 correcting of the discovery melodies from file RMS.
* 08.06.08 working of switching the size of screen and panel of file did not conclude where must.
* 08.06.08 to the charger trifle.
* 08.06.08 during correcting or adding the laying, did not show [ikonka] of page in the field of introduction.
* 08.06.08 logotype into [info] about the program was sketched with the fixed sizes (urgently for the designer).
* 04.06.08 with the off module of [multimedia] did not work charger.
* 03.06.08 with the off color diagrams did not show [splesh] with the starting.
* 03.06.08 correcting of determining the dimension of file for file RMS (it did not work [apload] with the old method).
* 27.05.08 sometimes was not restored the concealed load.
* 27.05.08 prohibition of working the pressure of the keys or [stilusa] during tracing of animation.
* 27.05.08 copying of the field of the showing of color in tuning of color diagrams.
* 26.05.08 with the showing of the list of the established hot * is removed the same combination for the layings.
* 25.05.08 selection of element in the list on the system page, shut this page itself (only alternative cache).
* 24.05.08 test from the hovering on SEK750.
* 24.05.08 after the import of color diagram it immediately adapted, and on to preserve was dropped to current that edited.
* 24.05.08 was dropped position on the page after output from the list (alternative cache).
* 24.05.08 after the test of network, on OK, passed to home page, now it returns to tuning of network.
* 23.05.08 showing of the time of a change in the files was without taking into account correction in the tuning form.
* 23.05.08 [v] the window of the change of color screen should not have been expanded.
* 22.05.08 with the survey of text in the coding UTF, did not pass further 2[y] of page.
* 22.05.08-23.05.08 [v] tuning by FTP did not replace the reference of the survey of local catalog to the button.
* 22.05.08 error during unloading of image from the camera.
* 22.05.08 [v] of history strip- limiter to the left it [otrisovyvalas] only for the first 10 expanded blocks.
* 21.05.08 did not work the switching on of fictitious (RMS) file system for cache on the disk with the presence of access to “normal” file system.
* 20.05.08 on the emulator Of esmertec of jbed, during redefining of hot to the literal keys, always showed name as UP.
* 20.05.08 [v] the list 20.05.08 [v] the list hot (Menu-Option- information -[Gor].[knopki]).
* 20.05.08 correcting of testing in tuning of network.
* 16.05.08 correcting of the sending of sms.
* 16.05.08 correcting of the test of connection.
* 14.05.08 with the discovery of reference from the history into the new (background) window, page was not opened.
* 14.05.08 during closing of the panel, in which [idet] the working or the load of page, other panels, the [ozhidayushchiyushchie] ends of this, did not move in the turn.
* 11.05.08 on the small screens (132*176) did not always show date in the history on the convoluted blocks.
* 11.05.08 SK65 and the turning of [klavy].

DOWNLOAD 1
DOWNLOAD 2

ariefew.co.cc

Internet Gratis dengan Opera Mini Mod

Sebenarnya sudah lama kucoba oprek opera mini mod, tapi berkali-kali kucoba install bebagai macam versi yang kudapat, berkali-kali juga mengalami ketidak cocokan. Ketidak cocokan tersebut di HP atau di kartunya, belum kucek lebih jauh. Sampai….. ada komen dari teman kita…..

bodo–>September 17th, 2008 at 10:58 pm

numpang duduk lg ah :-D . mas arief dan kawan2 bhas jg dunk opera mini mod isat! oiya dnger2 opera mini mod axis jg dah keluar ya?

Dari sini, kucoba install dan oprek semua opera yang kumiliki dengan memakai kartu XL-ku yang mempunyai pulsa Rp.0,- dan dalam masa tenggang… dan akhirnya….. berhasil kutemukan opera mini mod 3.10 yang jalan dengan sempurna, tanpa setting apapun.

Tapi bagaimana dengan kartu lainnya? atau dengan kartu XL yang ada pulsanya, apa termakan?

Akan kucoba lebih jauh…….

==============
Hasil Test Sementara
==============

  • Software : Opera Mini Mod 3.10
  • Hp support : Nokia 6210i (s60v3), SE P910i (s-uiq), SE 800i (java-midp2)
  • kartu yg bisa : Pro-XL pulsa 0 …
  • Kartu yang kena pulsa : IM3, Halo …
  • Kartu yang tdk bisa : …

Untuk kartu lain, selain PRO-XL, perlu adanya tambahan (misal modifikasi header) untuk menggratiskannya. Selain Opera Mini Mod yg standar, ada lagi Opera Mini Mod yang dikhususkan untuk kartu-kartu tertentu (misal ISAT, yaitu Opera mini 4.1 Mod)

==============
Instalasi di PRO-XL
==============

setelah file jar terinstall di HP kita, akan ada penyetingan otomatis yang agak lama. Ikuti [yes] terus sampai selesai. Jangan rubah settingan apapun. Buka URL seperti biasa (tanpa tambahan). Support HTTP & HTTPS

===========================
OPERA MINI MOD 3.10 & DOWNLOAD
English Version
===========================

ariefew.co.cc

Mempercepat Firefox & Mozilla

Beberapa cara untuk mempercepat browser firefox :

  • About:config

Pada address bar ketik about:config
Pada kolom filter tuliskan network.http
Untuk merubah beberapa setingan, klik ganda.
Ubah network.http.pipelining menjadi true
Ubah network.http.proxy.pipelining menjadi true
Beri nilai network.http.pipelining.maxrequests misal 30. ( browser merequest 30 permintaan pada saat bersamaan).
Klik kanan pada sembarang tempat, pilih New, Integer. Beri nama nglayout.initialpaint.delay dan isi nilainya 0.
Restart Firefox anda

Merupakan software untuk mempercepat firefox dengan penyetingan mudah

Merupakan softwarte untuk memperkecil pemakaian memory ( mem usage )

Merupakan softwarte untuk memperkecil pemakaian memory ( mem usage )

Silahkan dicoba …..

ariefew.co.cc

MASALAH YOUR FREEDOM SULIT KONEK XL

Di MASALAH PRO-XL KAWIN SAMA YOUR-FREEDOM telah dijelaskan bahwa untuk mengatasi sulitnya koneksi YF ke XL yaitu dengan :

Lakukan konfigurasi proxy xl [next]

Jika muncul tulisan hijau anda beruntung, jika muncul tulisan merah biarkan saja (lakukan berulang-ulang, untuk ping proxy xl). Cancel.

Lakukan konfigurasi manual di YF –> proxy XL, server YF, dan lainnya yang telah kubahas sebelumnya. Lakukan searching server YF secara berulang-ulang (untuk ping juga).

Jika tidak menemukan server YF, biarkan [save & exit], atau ulangi lagi searching lagi…

Lakukan koneksi ke server YF. Lakukan berulang-ulang sampai pintu YF terbuka.

Jika pintu YF sulit terbuka padahal cara-cara diatas sudah dilakukan, itu pertanda terjadi “kesalahan” dikoneksi HP (walaupun terlihat konek), maka lakukan salah satu cara dibawah ini :

  • Matikan hidupkan HP
  • Cabut tancapkan kabel data
  • Re-dialup berulang-ulang
  • Set jaringan HP secara manual, pilih jaringan selain XL, matikan hidupkan HP
  • Cari sinyal yang stabil (tidak perlu sinyal full)
  • Hapus cache & temperory browser

ariefew.co.cc

TELPON GRATIS KE 8 NEGARA

Ini merupakan pengalaman dari seorang teman yang menggunakan fasilitas internet untuk menelpon 'teman-temannya' yang ada di Hongkong. 'Teman-teman' itu sebagian besar didapatnya dari chat dan sebagian besar merupakan para TKW yang ada disana :-).

Bagaimana sih caranya ?

Chat dan masuk aja ke room tertentu dan silahkan chat, dan dapatkan nomor telponnya..... ( gampang-gampang susah nih !!! ). Itu saja ?

Masuk ke website Mediaring Talk, daftar account (free), download programnya....

Free PC-to-PC - high quality VoIP calls to anywhere in the world!
Call any phone number with PC-to-Phone service.
Receive calls from any phone with Phone-to-PC service.
5-user Voice Conferencing - host your conference call on demand
Instant Messaging (IM) - chat with your contact or collaborate with up to 5 users

Untuk lebih jelasnya, ini akan kuurai setahap demi setahap mengenai Mediaring Talk, dengan gambar-gambar berikut ini :

Tampilan awal

Pendaftaran user (free)

Pemilihan negara tujuan

Download Software

Setting Software

Running Mediaring Talk..

ariefew.co.cc

Internet Pakai Your Freedom di ASTINET

Internet di "kantor" menggunakan TELKOMnet ASTINET. Walaupun mempunyai bandwith 2Mbps + Fiber Optic, karena di-proxy ( pakai squid ) untuk banyak komputer, malah kadang2 terjadi drop. Pihak administrator, sebenarnya sudah mengantisipasi ini antara lain dengan membatasi pemakai / akses ke website-website tertentu. Itu Bagus, tetapi untukku itu bencana ( bukan untuk akses website porno, tetapi untuk pencarian crack & serial ).

Dulu untuk mengakali blokir proxy tersebut, kadang kupakai anynomous web proxy, atau pakai ultrasurf. Jika pakai Web proxy kecepatan yang kudapat tambah down, Sedangkan Jika pakai ultrasurf, lancar tapi kadang redirect ke website ultrasurf dan untuk browser yang didukung cuma IE.

Secara iseng kupasang Your Freedom dengan settingan yang sama dengan XL, tapi untuk proxynya ku ganti dengan proxynya telkomnet. Dan hasilnya. Cepat dan tanpa batasan .... Blokiran lolos semua !! Tapi tidak kupakai terus... (hanya jika diperlukan) untuk menjaga kestabilan akses pengguna lainnya :-)

Tapi sayang, jika kita berkata billing, aku tidak bisa mengeceknya, soalnya ini paket. Tapi dari sini, timbul pemikiran baru, bahwa Your Freedom bisa digunakan untuk semua bypass. Tinggal kita menerapkannya untuk apa, dan bagaimana penerapannya.

Bagaimana penerapannya untuk opsel lainnya ???

ariefew.co.cc

Friday, September 5, 2008

KODE RAHASIA PONSEL

Selama ini kita tidak terlalu memperhatikan berbagai kode rahasia yang dimiliki setiap Ponsel. Mungkin yang ada di pikiran kita hanya Nokia saja yang memiliki kode rahasia, namun ternyata, ponsel lain juga memiliki kode rahasianya sendiri-sendiri dan tentunya, memiliki fungsi yang pasti berbeda.

Kode Rahasia Umum Symbian
*#06# Melihat IMEI
*#0000# Melihat Versi sofware
*#9999# Melihat Versi sofware
*#7370# Soft Reset
Untuk Hard reset: Tekan Tombol hijau, 3 dan * ditekan bersamaan, tekan tombol power. Password standar 12345
*#92702689# Melihat info tanggal perbaikan

Kode Rahasia Umum Java
*#7380# Reset atau Restore Factory Setting Nokia seri 40
*#7370# Reset atau Restore Factory Setting Nokia seri 60
*3370# Untuk restart ponsel Nokia 3310
*#7220# Mengaktifkan GPRS PCCCH
*#3925538# Menghapus Wallet di ponsel Nokia 6610,63101, data Wallet terhapus semua
*#67705646# Menghapus operator logo di ponsel Nokia 3310 & 3330

Operator GSM

Selain kode rahasia yang ada di ponsel, operator GSM juga memiliki kode rahasia untuk layanan yang diberikan pada pelanggan.
Call Diverting/ Call Forward/ Pengalihan Semua
* * 21* NUMBER # [SEND] Mengaktifkan
# # 21 # [SEND] Membatalkan
* # 21 # [SEND] Melihat status
Call Diverting/ Call Forward/ Pengalihan bila tak ada jawaban
* * 61 * NUMBER # [SEND] Mengaktifkan
# # 61 # [SEND] Membatalkan
* # 61 # [SEND] Melihat status
Call Diverting/ Call Forward/ Pengalihan bila dilu-ar jangkauan
* * 62 * NUMBER # [SEND] Mengaktifkan
# # 62 # [SEND] Membatalkan
* # 62 # [SEND] Melihat status
Call Diverting/ Call Forward/ Pengalihan bila sibuk
* * 67 * NUMBER # [SEND] Mengaktifkan
# # 67 # [SEND] Membatalkan
* # 67 # [SEND] Melihat status
# # 002 # [SEND] Membatalkan semua pengali-han
Diverting Data/ Forward Data/ Pengalihan semua data
* * 21 * NUMBER * 25 # [SEND] Mengaktifkan
# # 21 # * 25 [SEND] Membatalkan
* # 21 # * 25 # [SEND] Melihat status

NOKIA

Nokia 9300/ 9500
*#170602112302# Melihat versi software
*3370# Memakai tenaga baterai cadangan
#3370# Menon-aktifkan Enhanced Full Rate Codec ( EFR).
*#4720# Mengaktifkan Half Rate Codec.
#pw+1234567890+l# Melihat status Provider Lock, (tekan * untuk simbol p,w +)
#pw+l 234567890+2# Melihat status Network Lock, (tekan * untuk simbol p,w +)
#pw+1234567890+3# Melihat status Country Lock, (tekan * untuk simbol p,w +)
#pw+1234567890+4# Melihat status SIM ‘Card Lock, (tekan * untuk simbol p,w +)
*#21# Melihat semua panggilan yang dialihkan.
*#2640# Menampilkan Security Code.
#30# Melihat Private Number.
*#73# Reset the Phone Timers.
*#746025625# Menampilkan status SIM Clock.
*#7760# Manufactures code.
*#7780# Restore factory settings
*#92702689* Melihat garansi posnel
(*#WAROANTY#)
Tekan & tahan tombol “Shift + Ctrl + F dan tombol Power Soft Reset

Nokia E60
*#92702689# *#warOanty# Melihat IMEI. Tanggal pembelian, tanggal servis.
*4720# (*hraO#) Mengaktifkan Half Rate
#4720# (#hraO#) Menon-aktifkan Half Rate
*3370# (*efrO#) Mengaktifkan Enhanced Full Rate
#3370* (#efrO#) Menon-aktifkan Enhanced Full Rate
* #746085685* (*#simOclock#) Melihat sta¬tus SIM lock
*#7220# (*#peaO#) Mengaktifkan GPRS dan dukungan Packet Common Control Channel (PCCCH)
*#7230# (*#pcdO#) Menon-aktifkan GPRS dan dukungan Packet common control channel (PCCCH)
*#7760# (*#ssnO#) Melihat nomor seri pabrikasi
*#2820# (*#btaO#) Melihat alamat Bluetooth MAC
*#7370925538# (*#resOwallet#) Reset the Mobile Wallet, data akan hilang semua

Nokia E61
Tahan # Berganti profile dan mode diam.
Tombol fungsi biru + Ctrl Mengaktifkan Bluetooth
Tombol fungsi biru + Chr Mengaktifkan IR
Ctrl + C Copy
Ctrl + X Cut
Ctrl + V Paste
Ctrl + Joystick Down Page Down (turun satu halaman)
Ctrl + Joystick Up Page Up (naik satu halaman)
Shift + Joystick Left or Right Menyorot satu lurus
Shift + Ctrl + Joystick Left or Right Menyorot satu kata
Ctrl + Joystick Left or Right Menggerakkan cursor diantara kata
*#2820# Melihat alamat Bluetooth
*#62209526# Melihat alamat adapter WLAN MAC
*#92702689# Melihat usia ponsel

Nokia E65
*#92702689# *#warOanty# Melihat IMEI. Tanggal pembelian, tanggal servis
*4720# (*hraO#) Mengaktifkan Half Rate
#4720# (#hraO#) Menon-aktifkan Half Rate
*3370# (*efrO#) Mengaktifkan Enhanced Full Rate
#3370# (#efrO#) Menon-aktifkan Enhanced Full Rate
*#746085685# (*#simOclock#) Melihat sta¬tus SIM lock
*#7220# (*#pcaO#) Mengaktifkan Half Rate
*#7230# (*#pcdO#) Menon-aktifkan Half Rate
*#7760# (*#ssnO#) Mengaktifkan Enhanced Full Rate
*#2820# (*#btaO#) Menon-aktifkan Enhanced Full Rate
*#7370925538# (*#resOwallet#) Melihat status SIM lock

Nokia E70
*#btaO# Melihat alamat Bluetooth
*#macOwlan# Melihat alamat adapter WLAN MAC
*#oprOlogo# Menghilangkan logo operator
*#pcaO# Mengaktifkan logo operator
*#pcdO# Menon-aktifkan GPRS dan dukungan Packet common control channel (PCCCH)
*#simOclock# Melihat status SIM clock
*#170602112302# Melihat versi software
*#warOanty# Melihat kode garansi
#pw+1234567890+n#
n = 1
n = 2
n = 3
n = 4 Menampilkan status SIM lock
provider lock
network lock
country lock
SIM lock

Nokia N80
*#92702689* *#warOanty# Melihat IMEI. Tanggal pembelian, tanggal servis
*4720# (*hraO#) Mengaktifkan Half Rate
#4720* (#hraO#) Menon-aktifkan Half Rate
*3370# (*efrO#) Mengaktifkan Enhanced Full Rate
#3370* (#efrO#) Menon-aktifkan Enhanced Full Rate
*#746085685* (*#simOclock#) Melihat sta¬tus SIM lock
*#7220# (*#pcaO#) Mengaktifkan dukungan GPRS dan Packet Common Control Channel (PCCCH)
*#7230#. (*#pcdO#) Menon-aktifkan dukun¬gan GPRS and Packet common control channel (PCCCH)
*#7760# (*#ssnO#) Melihat nomor seri pabrikasi
*#2820# (*#btaO#) Melihat alamat Bluetooth MAC
*#7370925538*. (*#resOwallet#) Reset the Mobile Wallet

Nokia N91
*#06# Melihat IMEI.Tanggal pembelian, tanggal servis
*#0000# Menampilkan versi firmware dan tanggal
*#btaO# Melihat alamat Bluetooth MAC
*#oprOlogo# Menghilangkan logo operator
*#pcaO# Mengaktifkan dukungan GPRS PCCCH
*#pcdO# Menon-aktifkan dukungan GPRS PCCCH
*#resOwallet# Reset the mobile wallet
*#simOclock# Menampilkan status SIM clock
*#ssnO# Menampilkan nomor seri pabrikasi
*#warOanty# Menampilkan garansi dan servis
*efrO# Mengaktifkan encoding EFR
#efrO# Menon-aktifkan encoding EFR
*hraO# Mengaktifkan encoding HR
#hraO# Menon-aktifkan encoding HR
#pw+1234567890+n#
n = 1
n = 2
n = 3
n = 4 Menampilkan status SIM lock
provider lock
network lock
country lock
SIM lock

Nokia N93
*#92702689* *#warOanty# Melihat IMEI. Tanggal pembelian, tanggal servis
*4720# (*hraO#) Mengaktifkan Half Rate
#4720#* (#hraO#) Menon-aktifkan Half Rate
*#3370# (*efrO#) Mengaktifkan Enhanced Full Rate
*#746085685* (*#simOclock#) Melihat status SIM lock
*#7220# (*#pcaO#) Mengaktifkan dukungan GPRS dan Packet Common Control Channel (PCCCH)
*#7230# (*#pcdO#) Menon-aktifkan dukung¬an GPRS and Packet common control channel (PCCCH)
*#7760# (*#ssnO#) Melihat nomor seri pabrikasi
*#2820# (*#btaO#) Melihat alamat Bluetooth MAC
*#7370925538# (*#resOwallet#) Reset Mobile Wallet
Nokia N96
*#92702689# Melihat umur ponsel
*#62209526# Alamat Wireless MAC (M A C _ WLAN)
*#2820# Alamat Bluetooth MAC (B T A 0?)
*#7370# Format Soft Reset
*#7780# Factory Reset/ Hard Reset

SAMSUNG
Untuk membuka kode ponsel Samsung, dapat dilakukan dengan cara posisi SIM Card tidak terpasang pada ponsel. Namun kode dibawah ini tidak akan berfungsi pada beberapa versi ponsel Samsung secara keseluruhan.
*#06# Melihat IMEI
*2767*5282# Java reset
*2767*63342# Reset media
*2767*927# Wap reset
*#9998*4357# Help menu
**9998*5282# Setting Java server
*#9999#0# Melihat monitor mode
*#9999# Sofware version
*#8888# Hardware version
*#9998*748# SIM info
*#9998*523* Contrast layar ponsel
*#9998*842* Vibration ON lalu tekan OK
*#9998*289# atau *0289# atau *#0289# Buzzer ON lalu tekan OK
*#9998*782* Menunjukkan tanggal & alarm
*#8999*638# Menunjukkan info network
*#9998*5646* Mengubah logo operator
*#9998*968* Menunjukkan nada untuk alarm
*#3243948# Digital audio interference OFF
*#32436837# Digital audio interperence
*#0001# Menunjukkan serial parameter
*#9998*228# Melihat kapasitas batera
*2767*2878# Custom EEEPROM reset
*2767*3855# Full EEPROM reset
*#9998*585# Non-Volatile Memory (NVM)
*#9998*76# Nomor produksi
*#9998*782# Menunjukkan tanggal dan jam alarm
*#9998*778# or *#9998*0778# or
*#0778# Daftar layanan SIM
*#9998*377# or *#9998*0377# Error log
*#9998*746# or *#9998*0746# or
*#0746# Sim Info
Samsung V200 & V300
*2767*63342# Unlock Code
*2767*3855# Unlock Code
*2767*2878# Unlock Code
*2767*927# Unlock Code
*2767*7822573738# Unlock Code

LG

2945#*# Test mode LG
2945*#01*# Menu rahasia
*#06# IMEI
*#07# IMEI and SW
*8375# Software version (LG B1200):
*6861# Recount cheksum (LG B1200)
*PWR 668 Factory test (B1200):
1945#*5101# Simlock menu (LG B1200)
2945#*5101# Simlock menu (LG 510W, 5200)
2945#*70001# Simlock menu (LG 7020, 7010)
2947#* Simlock menu (LG 500, 600)

BENQ SIEMENS

*#06# Versi software BenQ Siemens, lebih lengkapnya, tekan softkey beberapa kali
*#0001# Menu bahasa Inggris
*#0606# Kode rahasia, lepaskan SIM card lebih dulu
*#0003*(secret code)* Unlock Sim
*#0049# Menu bahasa Jerman
*12022243121 Layar tambahan

BENQ

C30 *#06# Cek IMEI
*#166*# Cek Versi Software C36 *#06# Cek IMEI
*#166*# Cek Versi Software T60 *#06# Cek IMEI
*#66*# Cek Versi Software E72 *#06# Cek IMEI
Mengganti bahasa ke default atau English *#0000# —> dial.
Mengganti bahasa dari English ke Indonesia: *#0062# —> dial.
* melihat kode negara

MOTOROLA
Pada ponsel Motorola terdapat symbol yang cukup aneh untuk fungsi Pause. Symbol [] (Pause) maksudnya tekan tombol * dan tahan hingga muncul tanda []. Masih banyak kode-kode lain yang ada. Jika angka terakhir dengan angka 0 maka kita dapat menon-aktifkan kode tersebut. Nomor tiga digit di bagian tengah dimulai dari angka 0 hingga 999. Kita bisa mengganti frekuensi menjadi 900/1800 den¬gan memasukkan tipe tertentu. Berikut ini langkah-langkahnya.
*#06# Melihat IMEI
Tekan bersamaan * 7 Kode untuk membuka tombol
[] [] [] 0 0 8 [] 1 [] Memilih line telepon - (gunakan untuk menulis sesuatu di bawah nama provider
[] [] [] 1 0 5 [] 1 [] Menambahkan phonebook di menu utama
[] [] [] 1 0 7 [] 1 [] Menambahkan pesan di menu utama
[] [] [] 1 0 8 [] 1 [] Copy memory SIM (menu phonebook)
[] [] [] 1 1 3 [] 1 [] Pilihan teknis (menu utama)
[] [] [] 1 0 1 [] 1 [] Slow (Frequency menu pen-cari)
[] [] [] 1 0 2 [] 1 [] Medium (Frequency menu pencari)
[] [] [] 1 0 3 [] 1 [] Fast (Frequency menu pen¬cari)
[] [] [] 1 1 9 [] 1 [] Mengaktifkan EFR
[] [] [] 0 0 4 [] 1 [] Mengganti Pin
[] [] [] 0 0 5 [] 1 [] Membuka blok menggu-nakan nomor PUK

Ponsel China

Seperti halnya ponsel branding, ponsel China juga memiliki kode rahasia untuk mengakses menu-menu rahasia. Ponsel China ini memiliki fitur seperti layar sentuh, dual kamera, dual sirh, dual baterai, dual charger dan fitur-fitur lainnya. Sebagian besar ponsel China memiliki software dan fitur yang sama, namun tampilannya saja yang terlihat berbeda.
1122, 3344, 1234, 5678 Kode default user
*#110*01# Mode teknis
*#987# Mode pabrik Factory mode
*#110*01# -> Device -> Set UART -> PS Config -> UART1/115200 Mengaktifkan port COM
*#987*99# Restore factory settings
*#369# Mengatur LCD contrast
*#800# software version
*#900# software version
*#0000# Send Mengatur bahasa standard
*#0044# Send Mengatur bahasa Inggris
*#001# Send Mengatur bahasa Inggris (firmware baru)
*#0086#, *#0886# Mengganti ke bahasa China
*#0084#, *#0966# Mengganti ke bahasa Vietnam

Internet Indosat dan IM3 Gratis

Dari dulu, “kartu” yang satu ini sering terdapat bug……. mulai dari tetap gratis walaupun pulsa habis, pembelian voucer m2 gratis…… Memang dari dulu permasalahan di “kartu” ini ada di header value…..

===========================================================

Untuk yang pakai IM3, bagaimana kalau anda mendownload i-go….

gratis ya? disini ada celahnya ……

===========================================================

ISAT by 202.87.46.133

isat pake proxo + YF + openVPN

Sebelum dial-up pilih property >> Networking >> TCP / IP >> Properties >> Advanced >> Hilangin tanda centang yg ada di general

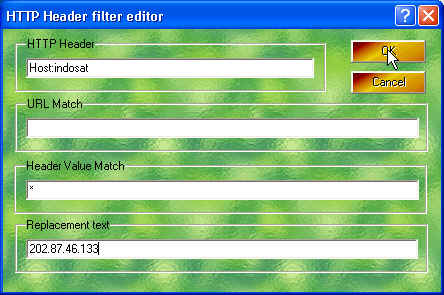
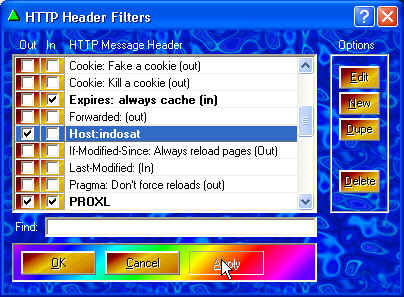
Sett Proxo >> Headers >> New >> HTTP Header diisi host:indosat >> URL Match kosongin >> Header Value Match * (bintang) >> Replacement text 202.87.46.133 >> Ok >> Apply >> centang out >> ok
Proxy 10.19.19.19:8080 (proxy isat)

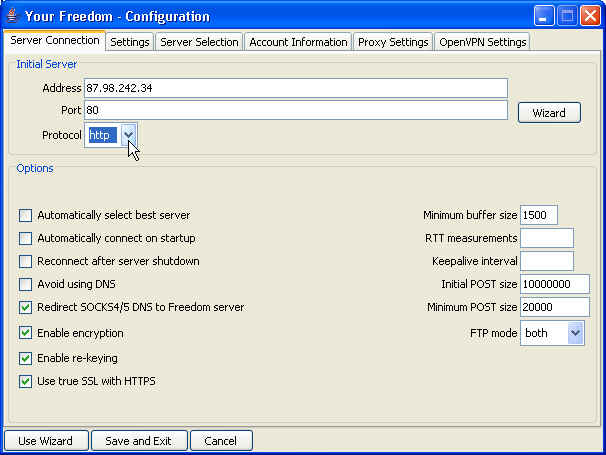
Sett YF >> configuration >> address terserah ems berapa, protocol https >> proxy setting 127.0.0.1:8080

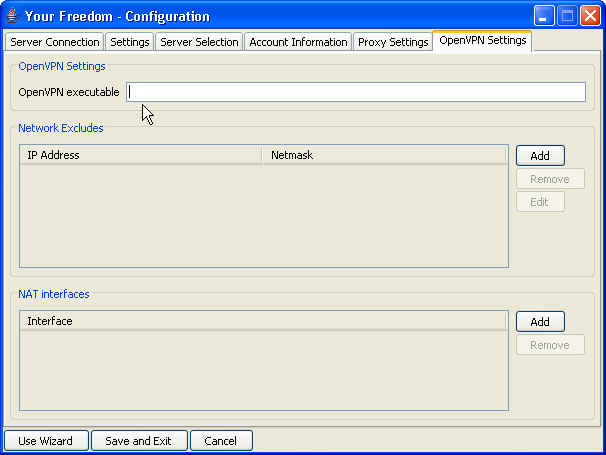
>> OpenVPN setting diisi C:\Program Files\OpenVPN\bin\openvpn.exe (tergantung tempat instal, openVPN hrs diinstal) >> save&exit

>> buka port centang semua >> web proxy 4444 (terserah, yg penting sett proxy browser jg ngikut 4444) >> start connection

Sett proxy browser 127.0.0.1:4444 (ngikut port proxy web YF)

=============================================================

TRIK TANPA PROXO

Your Freedom Configure :

  • Server connection, address : wap3g.indosat.com@ems…… atau 202.87.46.133@ems…..
  • Port : 443, protocol : HTTPS
  • Proxy Settings, proxy:10.19.19.19:8080
  • Save & Exit
  • Start connection
  • Sett proxy browser 127.0.0.1:8080

=============================================================

TRIK MMS GRATIS INDOSAT

Ganti settingan MMS Homepage jadi https://smsc.indosat.com

=============================================================

INFO LAIN :

ariefew.co.cc

Mempercepat Akses Internet dengan cFosSpeed

Pada tranfer data TCP/IP di Windows, sejumlah data harus dikonfirmasikan dahulu
sebelum data itu dikirim. Konfirmasi ini biasanya waktu (delay), yang terkadang
membikin arus aliran data tersebut tidak lancar / lambat ( transfer-rate
slowdowns
). Hal ini terutama terjadi pada DSL dan kabel, yang mana terjadi
penyempitan bandwidth sehingga konfirmasi data tidak cukup bandwidth.
Solusi dari ini kita bisa mencoba memperbesar TCP window size, dengan demikian
membiarkan lebih banyak data yang dikirim tanpa konfirmasi yang segera. Masalahnya
disini, hal ini juga mengarah pada high ping times (latency) dan masa
tunggu (delays)
utama pada render halaman web (Webpage rendering).
Latency lebih dari 2 detik, bukanlah luar biasa untuk TCP windows
yang sebesar 64k. Dengan kata lain dari ini semua, ukuran-ukuran jendela (windows)
sangat besar peranannya dalam mencapai kecepatan download penuh.

cFos Traffic Shaping memprioritaskan lalu lintas data dalam paket-paket
penting. Cara ini, data masuk selalu tiba pada waktunya, dan upload-upload
tidak akan pernah menghambat koneksi broadband lagi. cFos Traffic-Shaping
technology recognizes
mengenali tipe paket penting dan memprioritaskannya
tidak hanya untuk pemeliharaan lalu lintas Internet yang lembut tetapi juga
untuk memastikan low ping times. Hal ini juga tidak hanya mempercepat
surfing dan download secara signifikan, tetapi juga merupakan
solusi untuk online gaming.

Setelah instalasi cFosSpeed, settingan yang utama ada di

  • Connect to… atau Options - Connection,
    yaitu settingan untu dialup connection dan router connection
  • Option - Setting - Preferences yaitu untuk Layer-7 Protocol
    Detection, Favour Ping Time, Activate Firewall, Automatic MSS (MTU) optimisation,
    Strict RTP checks.
  • Option - Setting - Protocol yaitu untuk setting priority
    dari DNS, SSL, FTP, Clien Protocol, Server Protocol, Media Streaming, File
    Sharing.
  • Option - Setting - Program yaitu untuk setting priority
    dari program yang akan kita gunakan seperti VOIP, Media Streaming, Game, File
    Sharing dll. Pada priority program ini kita bisa membuat definisi
    baru yang kita inginkan.

Untuk coba cFosSpeed silahkan
ambil di sini.

Silahkan dicoba, mungkin bermanfaat….

NB : file setup.exe akan terdeteksi trojan oleh antivirus, tapi hasil install tidak ada yang terdeteksi (Symantec AV, AVG, update 24/8/08)

ariefew.co.cc

Internet Gratis PRO-XL dengan Your-Freedom & cFosSpeed

Trik ini menggunakan Your-Freedom sebagai server

1. Connec proXL pake APN: www.xlgprs.net , Username: xlgprs password: proxl
2. Buka Your-Freedom kalau pada bagian konfigurasi server di pilih protokol UDP 53. emsnya terserah.
3. Start Connect YF nya
4. Setting http proxy di browser pake 127.0.0.1 port 8080
5. Selesai

Pemakaian secara langsung YF, masihlah terkena pulsa, hal ini dikarenakan adanya percarian server yang memakan waktu. Solusinya yaitu, pakailah ip yang telah aku scan pakai YF dibawah ini. Setting secara manual saja (di configure)…..

Name
Address
UDP
ems01.your-freedom.de
67.159.5.116
53
ems02.your-freedom.de
193.164.133.61
53
ems03.your-freedom.de
87.98.241.26
53
ems04.your-freedom.de
91.121.13.62
53
ems05.your-freedom.de
91.121.13.63
53
ems06.your-freedom.de
81.169.130.185
53
ems07.your-freedom.de
85.214.22.104
53
ems08.your-freedom.de
91.121.2.175
53
ems10.your-freedom.de
85.214.45.170
53
ems11.your-freedom.de
87.98.217.227
53
ems12.your-freedom.de
87.98.243.6
53
ems13.your-freedom.de
66.90.104.142
53
ems14.your-freedom.de
87.98.128.61
53
ems14.your-freedom.de
91.121.9.81
53
ems15.your-freedom.de
193.37.152.232
53
ems16.your-freedom.de
67.159.5.52
53
ems17.your-freedom.de
91.121.1.185
53
ems18.your-freedom.de
85.214.116.165
53
ems20.your-freedom.de
67.212.67.75
53
ems22.your-freedom.de
202.64.77.113
53
ems23.your-freedom.de
62.193.231.70
53

( pilih salah satu… )

Untuk cara setting, seperti yang disebutkan blog2 lainnya, yaitu daftar dulu di website YF. Download YF file. Install. Konek HP dengan PC. DialUp ( APN: www.xlgprs.net , Username: xlgprs password: proxl ). Running YF.

Pada cara biasa, setelah “welcome” [next]. Isi proxy address & port dengan punya XL (202.152.240.050 : 8080), [next]. Tunggu sampai keluar tulisan “all fine!…..” warna hijau. [next] Select protocols, [next]. Melakukan pencarian freedom server. Pilih salah satu server.

Tapi trik disini, hindarilah pencarian server tersebut dengan cara diatas. Setting semua secara manual. Pada YF - Status - Action - klik configure. di tabs Server connection isi server address & port seperti diatas, dan protocol isi udp. Pada tabs Account Information isi dengan username dan password yang telah di daftarkan. Pada tabs Proxy Setting isi Proxy Address & port dengan punyanya XL. Start Connection….. (sampai conection status muncul tulisannya semua, jika muncul isian voucer, isi dengan angka yang tertulis dikolomnya, dan klik “ok”).

untuk mempercepat connection gunakan cFos
Browser pakai K-Meleon dengan proxy 127.0.0.1 : 8080 ( biar enteng )

Pada penulisan Posting ini, trik ini masih jalan. Aku menggunakan kartu yang dipakai cek “123″ atau “*123#” sudah tidak bisa…. :-)

Untuk install dan setting Your Freedom secara lengkap dan umum, silahkan ke Install dan Setting YF

ariefew.co.cc

Sunday, August 31, 2008

Beep Code BIOS

Wordpress Version

Ketika kita menghidupkan komputer, BIOS akan mengontrol komputer dan melakukan P.O.S.T (Power On Self Test). Setelah POST selesai komputer akan mengeluarkan suara 'BEEP' satu kali beep pendek untuk mengetahui bahwa pengetesan sukses.

Tapi jika POST dari BIOS mengalami problem, yang dalam kondisi normal akan menampilkan visual error message di monitor. Jika problem terjadi sebelum BIOS inisialisasi video card atau video card tidak terdeteksi, maka BIOS akan mengeluarkan 'BEEPS' untuk mengetahui problem tersebut.

Sangatlah penting kita mengetahui arti dari 'BEEP' tersebut untuk acuan dalam memperbaikinya. Ini adalah tabel AMI, Phoenix dan Award BIOS beep codes.

AMI (American Megatrends International) BIOS Beep Codes.
AMI BIOS menggunakan beep yang sama panjang dan berurutan. Error diketahui dari banyaknya beep. Contohnya 4 beeps mengindikasikan timer gagal.

BEEP CODE
MEANING
POSSIBLE CAUSE
1 Beep (No video) Memory refresh failure Bad memory
2 Beeps Memory parity error Bad memory
3 Beeps Base 64K mem failure Bad memory
4 Beeps Timer not operational Bad motherboard
5 Beeps Processor error Bad processor
6 Beeps 8042 Gate A20 failure Bad CPU or Motherboard
7 Beeps Processor exception Bad processor
8 Beeps Video memory error Bad video card or memory
9 Beeps ROM checksum error Bad BIOS
10 Beeps CMOS checksum error Bad motherboard
11 Beeps Cache memory bad Bad CPU or motherboard

Award BIOS Beep Codes
Award BIOS menggunakan beep dengan durasi yang berbeda. Beep panjang biasanya berdurasi 2 detik dan beep pendek berdurasi 1 detik. Selain itu Award BIOS, juga menggunakan frekuensi yang berbeda untuk masalah kritis, misalnya pada overheating CPU akan berbunyi beep frekuensi tinggi yang terus menerus pada saat komputer running.

BEEP CODE MEANING POSSIBLE CAUSE
1 Long, 2 Short Video adapter failure Bad video adapter
Repeating (Endless loop) Memory error Bad memory or bad connection
1 Long, 3 Short Video adapter failure Bad video adapter or memory
High freq. beeps (while running) CPU is overheating CPU fan failure
Repeating High, Low beeps CPU failure Bad processor

Phoenix BIOS Beep Codes
Phoenix BIOS menggunakan beep code yang pasti untuk indikasi problem. Di tabel, tanda '-' yang berarti pause diantara beep.
Contohnya : 1 - 1 - 2 adalah BEEP BEEP BEEP BEEP

BEEP CODE MEANING POSSIBLE CAUSE
1 - 1 - 2 CPU / motherboard failure Bad CPU / motherboard
1 - 1 - 3 CMOS read/write failure Bad motherboard
1 - 1 - 4 BIOS ROM failure Bad BIOS chip
1 - 2 - 1 Timer failure Bad motherboard
1 - 2 - 2 DMA failure Bad motherboard
1 - 2 - 3 DMA failure Bad motherboard
1 - 3 - 1 Memory refresh failure Bad memory
1 - 3 - 2 64K memory failure Bad memory
1 - 3 - 3 64K memory failure Bad memory
1 - 3 - 4 64K memory failure Bad memory
1 - 4 - 1 Address line failure Bad memory
1 - 4 - 2 Parity error Bad memory
1 - 4 - 3 Timer failure Bad motherboard
1 - 4 - 4 NMI port failure Bad motherboard
2 - 1 - 1 64K memory failure Bad memory
2 - 1 - 2 64K memory failure Bad memory
2 - 1 - 3 64K memory failure Bad memory
2 - 1 - 4 64K memory failure Bad memory
2 - 2 - 1 64K memory failure Bad memory
2 - 2 - 2 64K memory failure Bad memory
2 - 2 - 3 64K memory failure Bad memory
2 - 2 - 4 64K memory failure Bad memory
2 - 3 - 1 64K memory failure Bad memory
2 - 3 - 2 64K memory failure Bad memory
2 - 3 - 3 64K memory failure Bad memory
2 - 3 - 4 64K memory failure Bad memory
2 - 4 - 1 64K memory failure Bad memory
2 - 4 - 2 64K memory failure Bad memory
2 - 4 - 4 64K memory failure Bad memory
3 - 1 - 1 Slave DMA failure Bad motherboard
3 - 1 - 2 Master DMA failure Bad motherboard
3 - 1 - 3 Interrupt controller failure Bad motherboard
3 - 1 -4 Slave IC failure Bad motherboard
3 - 2 -2 Interrupt Controller failure Bad motherboard
3 - 2 - 3

3 - 2 - 4 Keyboard control failure Bad motherboard
3 - 3 - 1 CMOS batter failure Bad CMOS battery
3 - 3 - 2 CMOS configuration error Incorrect setting
3 - 3 - 3

3 - 3 - 4 Video memory failure Bad video card or memory
3 - 4 - 1 Video init failure Bad video card or memory
4 - 2 - 1 Timer failure Bad motherboard
4 - 2 - 2 CMOS shutdown failure Bad motherboard
4 - 2 - 3 Gate A20 failure Bad motherboard
4 - 2 - 4 Unexpected interrupt Bad processor
4 - 3 - 1 RAM test failure Bad memory
4 - 3 - 3 Timer failure Bad motherboard
4 - 3 - 4 RTC failure Bad motherboard
4 - 4 - 1 Serial port failure Bad motherboard
4 - 4 - 2 Parallel port failure Bad motherboard
4 - 4 - 3 Coprocessor failure Bad motherboard or CPU.
9 - 2 - 1 Video adapter incompatibility Use a different brand of video card

Memperbaiki Blinking pada Printer (Waste tank Ink)

Wordpress Version

Kalau kita ingin beli printer baru, pasti pertanyaan kita " bisakah tintanya
di refill ? " Itu pasti, untuk pengiritan ! Apalagi sekarang banyak toko-
toko yang menawarkan langsung modif untuk pembelian printer baru.

Tapi dibalik permodifikasian dan merk printer, dibeberapa printer (terutama
yang baru) ada semacam counter untuk menghitung berapa kali kita melakukan
penge-print-an ( 4000x sampai 8000x tergantung vendor ). Hal ini oleh vendor,
dimaksudkan untuk menjaga tempat penampungan bak tinta waktu terjadi cleaning.
Dan apabila bak tinta tersebut waktunya penuh (pengecekan oleh counter=0), harus
dilakukan pembersihan . Hal ini biasa disebut Waste Tank Ink. Waste Tank Ink
pada printer biasanya ditandai dengan adanya blinking (led berkedip).

Bagaimana cara mereparasi ini?

  • Printer Canon

  • Printer Epson

  • Printer HP

Canon Waste Ink Tank Reset

Canon Waste Ink Tank Reset Procedures

Canon GENERIC "S" SERIES RESET CODE

Waste Ink Counter Reset.

(1) Turn off the printer.
(2) Press and hold the RESUME button, then press and hold the POWER button.
(3) Release the RESUME button, Next press and release the RESUME button two(2)
more times in succession. Note: you are still holding the POWER button). The printer's carriage
will "reset" or move momentarily. If the above was properly performed the printer will enter
the "Service Mode".
(4) Press the RESUME button 4 times, this will select the clear waste ink counter
function. The lamp will alternate (change) color with each key press.

1. Service/Factory test printout, including ink sensor check.
2. EEPROM - Info printout.
3. EEPROM - Initialization.
4. Reset the Waste ink counter.
5. Printer model setting. (More selections beyond this point - However it is
best leave them unaltered - You have been warned!)

After selecting the desired mode (eg 4), press the POWER button to "set"
the change, and return to the top of the function selection menu. Press the
POWER button again to restart the printer.

++++++++++

Canon i320, i255

Waste Ink Counter Reset.

Step 1 : Manual for service mode
1. Unplug power and USB.
2. Open door and hold power button.
3. Connect power.
4. Close door, then release power button.

or Step 1: Manual for service mode

1. Turn off the printer. And disconnect the printer cable.
2. Press and hold the POWER button, turn on the printer.
3. The indicator (L.E.D.) should be green.
4. Press and release the RESUME button , the indicator (L.E.D.) should be orange.
5. Press and release the RESUME button again, the indicator (L.E.D.) should
be green.
6. Release both buttons.

step 2 : Software for Permanan

1. Reconnect the printer cable.
2.Open General Tools software and select (USB PORT)
3 .Choose (SET DESTINATION 1) And it should be reset.

Remark "After service mode Pls use software for permanent reset"

++++++++++

Canon PIXMA iP1000

Waste Ink Counter Reset.

Step 1: Manual for Service mode
1. Unplug power and USB.
2. Open door and hold power button.
3. Connect power.
4. Close door, then release power button.

step 2 : Software for Permanant

1. Reconnect the printer cable.
2.Open General Tools software and select (USB PORT)
3 .Choose (SET DESTINATION 1) And it should be reset.

Remark "After service mode Pls use software for permanent reset"

++++++++++

Canon PIXMA iP1500

Waste Ink Counter Reset.

Step 1: Manual for Service mode

1. Unplug power and USB.
2. Open door and hold power button.
3. Connect power.
4. Close door, then release power button.

step 2 : Software for Permanant

1. Reconnect the printer cable.
2.Open General Tools software and select (USB PORT)
3 .Choose (SET DESTINATION 1) And it should be reset.

Remark "After service mode Pls use software for permanent reset"

++++++++++


Canon i850, i950, S600

Start with the printer OFF

1. Hold down RESUME and then hold down POWER
2. release RESUME
3. press RESUME twice, then release POWER
4. Let green light blink until printer is done futzing
Select function with RESUME press POWER to execute:
presses - light color - function
Number of presses - light color - function
0 presses - green - Test print (or exit service mode on i960)

1 press - orange - EEPROM info print (plus grid nozzle diagnostic on i960)
2 presses - green - EEPROM initialize
3 presses - orange - Reset waste ink counter

++++++++++


Canon S450 Printer

1: Power off printer
2: Hold Resume button then press and hold POWER, the beeper will sound once.
3: Hold POWER and release RESUME
4: Press RESUME twice
5. Release Power button
6: When the indicator lights steady, press RESUME three(3) times. The indicator should be orange.
7: Press Power to set data

++++++++++

Canon BJC 1000 Serie

1: Remove Cartridge
2: Unplug the AC Power Cord
3: Hold down the RESUME button
4: Release RESUME after plugging in the AC Power cord.
5: Press the RESUME once within 5 seconds and release the RESUME .
6: Press and HOLD RESUME for two seconds or more and release it.
7: Press and HOLD RESUME for two seconds or more and release it.
8: Unplug AC Power Cord to set data.

++++++++++

Canon BJC-2000 BJC-2100 Serie

1: Remove the Cartridge
2: Unplug the AC Power Cord
3: Close Front access panel
3: Hold down the RESUME/RESET button and plug in the AC power cord
4: Release RESUME/RESET after plugging in the AC Power cord.
5: Press the RESUME/RESET once within 5 seconds and release the RESUME/RESET
6: Press and HOLD RESUME/RESET for two seconds or more and release it.
7: Press and HOLD RESUME/RESET for two seconds or more and release it.
8: Unplug AC Power Cord to set data.

++++++++++

Canon BJC-210 BJC-240 BJC-250 BJC-255 BJC-265
Canon BJC-4100 BJC-4200 BJC-4300 BJC-4400 BJC-4550 BJC-4650

Unplug Power Cord
Hold POWER and RESUME buttons
Plug in Power Cord
Release buttons
Open front door of printer
Hold the CARTRIDGE and RESUME buttons
Press POWER
Release all buttons after the beeps
Press CARTRIDGE once
Press RESUME

++++++++++

Canon BJC-5000

1: Power off printer
2: Press and hold RESUME then press POWER, The indicator will start blinking.
3: While the indicator is blinking , Press RESUME twice then Wait until the
printer beeps to indicate service mode
5: When the indicator lights steady GREEN, press RESUME four(4)times. The indicator
should be GREEN.
6: Press Power to set data

Service Test Print

1: Power off printer
2: Press and hold RESUME then press POWER, The indicator will start blinking.
3: While the indicator is blinking , Press RESUME twice then Wait until the
printer beeps to indicate service mode
5: When the indicator lights steady GREEN, press RESUME two(2)times. The indicator
should be GREEN.
6: Press Power to Print
Nozzle Print
1: Power off printer
2: Press and POWER, until the printer beeps and release.
Demonstration Print
1: While the printer in ON , , Press and hold RESUME until the printer plays
a melody of beeps.

++++++++++

Canon BJC-5100

Self Test
Switch Printer off. Hold Power for 1 beep.

Waste Counter Reset

1: Power off printer
2: Press and hold RESUME then press POWER, The indicator will start blinking.
3: While the indicator is blinking , Press RESUME twice then Wait until the
printer beeps to indicate service mode
5: When the indicator lights steady GREEN, press RESUME four(4)times. The indicator
should be GREEN.
6: Press Power to set data
Service Test Print
1: Power off printer
2: Press and hold RESUME then press POWER, The indicator will start blinking.
3: While the indicator is blinking , Press RESUME twice then Wait until the
printer beeps to indicate service mode
5: When the indicator lights steady GREEN, press RESUME two(2)times. The indicator
should be GREEN.
6: Press Power to Print

Nozzle Print

1: Power off printer
2: Press and POWER, until the printer beeps and release.

Demonstration Print

1: While the printer in ON , , Press and hold RESUME until the printer plays
a melody of beeps.

++++++++++

Canon BJC-3000 BJC-6000 BJC-6100 BJC-6200 S400 S450 F300 F600 F620
Canon BJC-7000 BJC-7100 BJC-8000 BJ-F800 i6500

1: Power off printer
2: Hold Resume button then press and hold POWER, the beeper will sound once.
3: Hold POWER and release RESUME
4: Press RESUME twice
5: When the indicator lights steady, press RESUME three(3) times. The indicator
should be orange.
6: Press Power to set data

++++++++++

Canon BJC-600 BJC-600e BJC-610 BJC-620
1: Unplug Power Cord
2: Hold POWER and FF and Print Mode buttons
3: Plug in Power Cord
4: Release after the beeps

++++++++++

Canon BJC-50 BJC-55 BJC-80 BJC-85 M40 M70

1: Unplug Power Cord
2: Hold POWER and RESUME buttons
3: Plug in Power Cord
4: Release buttons after the printers starts up
5: Hold CARTRIDGE and RESUME
6: Press POWER
7: Release all buttons after the beeps
8: Press CARTRIDGE 16 times
9: Press RESUME
10: Unplug the Power cord

++++++++++

Canon BJ-30 BJC-35v BJC-70

F14 Error Reset
1: Unplug adapter
2: Hold POWER
3: Plug in ADAPTER
4: Release POWER after printer starts
5: Hold FF and MENU and press POWER
6: Release after beeps
7: Press <> Cartridge until 1A is displayed

8: Press ONLINE
9: Press POWER to shutoff printer
10: Unplug printer then re-plug printer

++++++++++

Canon BJ F900, F890, F700, F500, S900, S820, S750 and S520

Turn off the printer.
Press and hold the RESUME button, then press and hold the POWER button.
Release the RESUME button, then press and release the RESUME button two more
times in succession. (youre still holding the POWER button during this). The
printer mechanics will move momentarily.

You are now in Service mode.

Pressing the RESUME key will select a function; for example, pressing RESUME
4 times will select the clear waste ink counter function. The lamp will alternate
color with each key press.

1. service/factory test printout, including ink sensor check
2. EEPROM info printout
3. EEPROM initialization
4. Clear the waste-ink counter
5. Printer model setting. (more selections beyond this- leave this alone)

After selecting mode, press the POWER button to commit the change, and return
to the top of the function selection menu. Pressing the POWER button again turns
off the printer for a resta


++++++++++


Canon S9000, S300, S400, i550, i560, i850, i860, i865, i9100, i9950,
PIXMA iP3000 above,


1. Turn off printer
2. Hold down Resume button and press Power button.
3. Keep holding down Power button and let Resume button go.
4. Press Resume button 2 times then let BOTH buttons go.
5. Green lights will flash and then stop blinking.
6. When green lights are solid, press the Resume button 4 times.
7. Press the Power button and the printer should turn off, if not, press the
Power button once more.
8. Your printer should respond as normal.

+++++++++

Canon S900, S820, S750, S520

Turn off the printer.
Press and hold the RESUME button, then press and hold the POWER button.
While still holding the POWER button, Release the RESUME button, then press
and release the RESUME button two more times in succession.

The printer mechanics will move momentarily. You are now in Service mode. Release
the Power Button.

Pressing the RESUME key will select a function; for example, pressing RESUME
4 times will select the clear waste ink counter function. The lamp will alternate
color with each key press.

1. Service/factory test printout, including ink sensor check
2. EEPROM info printout
3. EEPROM initialization
4. Clear the waste-ink counter
5. Printer model setting. (more selections beyond this- leave this alone)

After selecting mode, press the POWER button to commit the change, and return
to the top of the function selection menu. Pressing the POWER button again turns
off the printer for a restart.

++++++++++

Canon S9000

Turn off printer
Hold down Resume button and press Power button.
Keep holding down Power button and let Resume button go.
Press Resume button 2 times then let BOTH buttons go.
Green lights will flash and then stop blinking.
When green lights are solid, press the Resume button 4 times.

Press the Power button and the printer should turn off, if not, press the Power
button once more.
Your printer should respond as normal.

+++++++++

Canon MPC190

Reset Waste Ink

1) Enter SERVICE MODE.
By pressing Menu, Copy, Scan, Copy, Copy
2) Select TEST MODE.
3) Select [8] PRINTER TEST in TEST MODE.
4) Select 3. [EEPROM CLEAR].
5) Select 0. [INK COUNT].
6) Press the [Set] key.
7) Press the [Stop/Reset] key (returning to the state of 3)), and then press
the [ON/OFF] key.

Twitter Delicious Facebook Digg Favorites More